Develop Spring Boot Application with PostgreSQL and Thymeleaf
Database Schema for Event Registration System
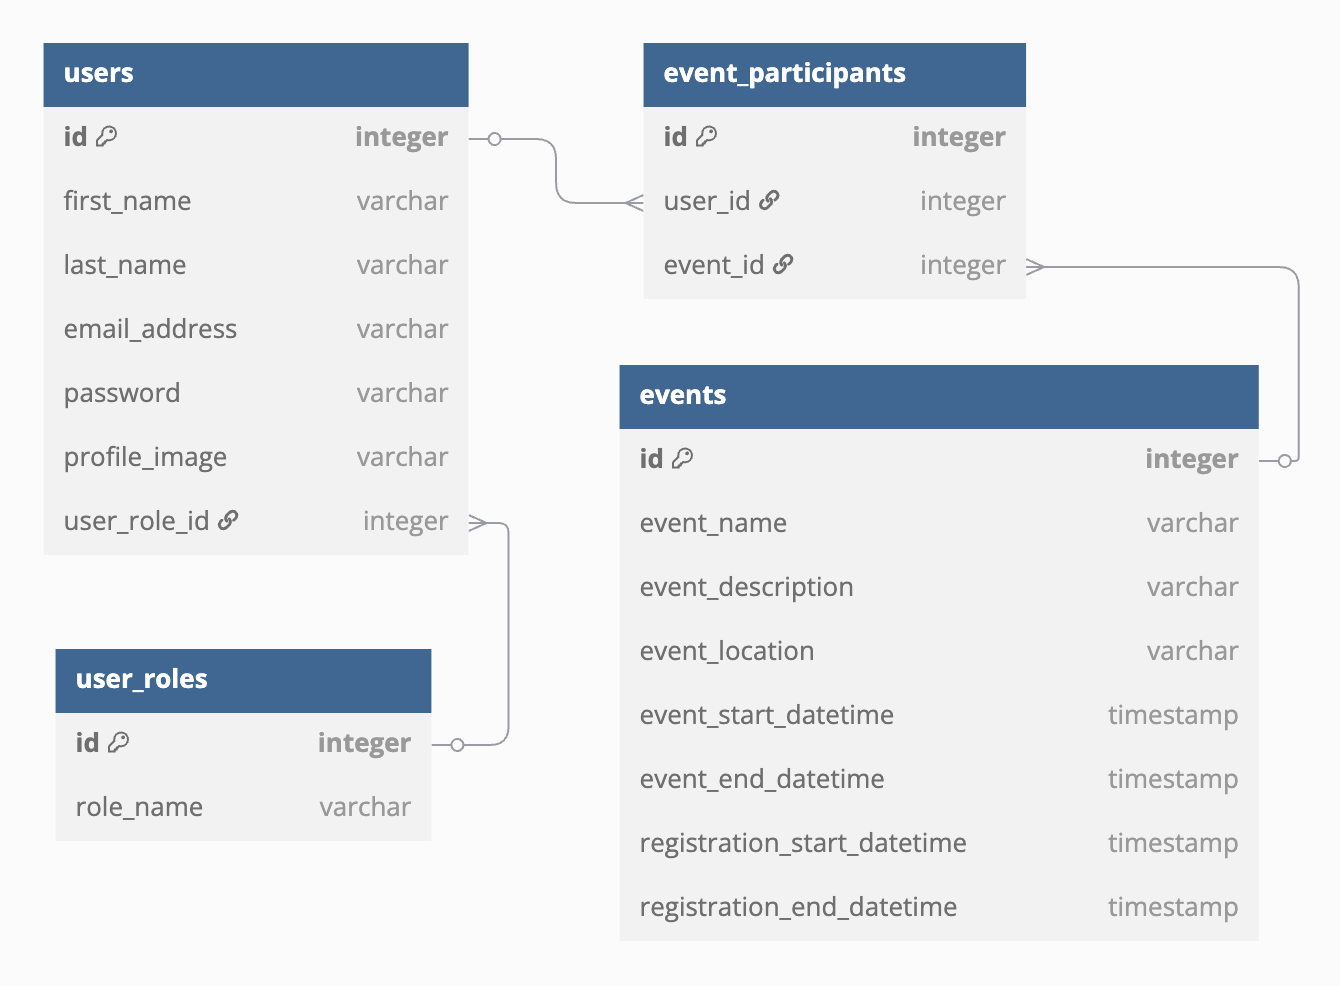
resources / schema.sql to create the database tables for the Event Registration System. Spring Boot will automatically execute this script on application startup to create the necessary tables.resources / schema.sql
CREATE TABLE IF NOT EXISTS user_roles (
  id SERIAL PRIMARY KEY,
  user_role_name VARCHAR(100) NOT NULL
);

CREATE TABLE IF NOT EXISTS users (
  id SERIAL PRIMARY KEY,
  first_name VARCHAR(100) NOT NULL,
  last_name VARCHAR(100),
  email_address VARCHAR(100) UNIQUE NOT NULL,
  password VARCHAR(100) NOT NULL,
  profile_image VARCHAR(100),
  user_role_id INT NOT NULL REFERENCES user_roles(id)
);

CREATE TABLE IF NOT EXISTS events (
  id SERIAL PRIMARY KEY,
  event_name VARCHAR(100) NOT NULL,
  event_description VARCHAR(500),
  event_location VARCHAR(100) NOT NULL,
  event_start_datetime TIMESTAMP NOT NULL,
  event_end_datetime TIMESTAMP NOT NULL,
  registration_start_datetime TIMESTAMP NOT NULL,
  registration_end_datetime TIMESTAMP NOT NULL
);

CREATE TABLE IF NOT EXISTS event_participants (
  id SERIAL PRIMARY KEY,
  user_id INT NOT NULL REFERENCES users(id),
  event_id INT NOT NULL REFERENCES events(id),
  UNIQUE (user_id, event_id)
);
Provision PostgreSQL Database and Configure PostgreSQL Driver
docker-compose.yml file to run PostgreSQL container. Make sure to have Docker installed on your machine.docker-compose.yml
services:
  postgres:
    image: postgres:14.7
    container_name: postgres
    ports:
      - "5432:5432"
    environment:
      POSTGRES_DB: "event_registration"
      POSTGRES_USER: "postgres"
      POSTGRES_PASSWORD: "postgres"
Run the following command to start the PostgreSQL container:
docker-compose up -dapplication.yml file with the following config:resources / application.yml
server:
  port: 8080

spring:
  application:
    name: event-registration
  datasource:
    url: jdbc:postgresql://localhost:5432/event_registration
    username: postgres
    password: postgres
  jpa:
    show-sql: true
  sql:
    init:
      mode: always
Make sure sql init mode is set to
never to avoid executing the schema.sql file in the production environment.Event Creation with Spring MVC Architecture
Event entity, defining Repository interface for database operations, building service layer to handle business logic, and setting up controller to handle form submissions and page rendering.entities / Event.java
public class Event {
private Integer id;
private String eventName;
private String eventDescription;
private String eventLocation;
private LocalDateTime eventStartDatetime;
private LocalDateTime eventEndDatetime;
private LocalDateTime registrationStartDatetime;
private LocalDateTime registrationEndDatetime;
}repositories / EventRepository.java
public interface EventRepository extends JpaRepository<Event, Integer> {
}services / EventService.java
public class EventService {
private final EventRepository eventRepository;
public Event createEvent(Event event) {
return eventRepository.save(event);
}
}controllers / EventController.java
public class EventController {
private final EventService eventService;
public String showCreateEventForm(Model model) {
model.addAttribute("event", new Event());
return "event/create";
}
public String createEvent( Event event) {
eventService.createEvent(event);
return "redirect:/event/list";
}
public String listEvents(Model model) {
model.addAttribute("events", eventService.getAllEvents());
return "event/list";
}
}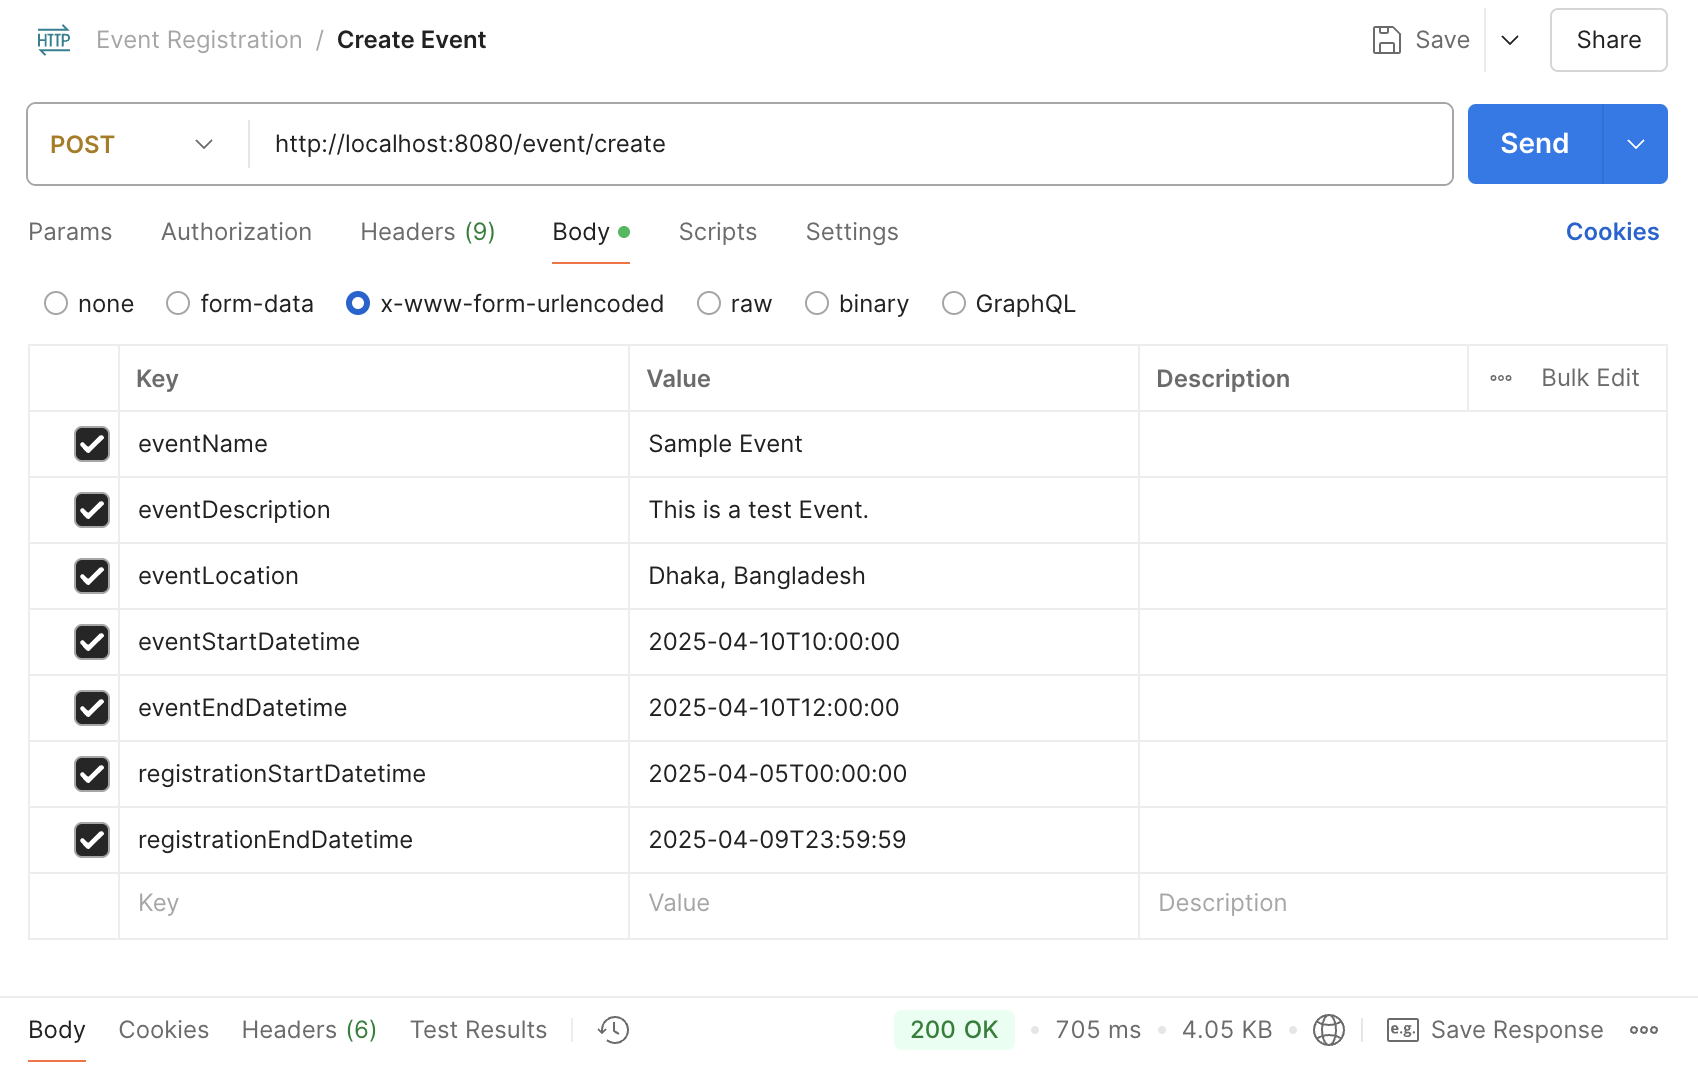
create.html inside the resources/templates/event directory. This form allow users to input event details and submit them to the backend. The backend will process the form data and save the event information in the PostgreSQL database.resources / templates / event / create.html
<form class="pt-6 space-y-4" th:action="@{/event/create}"
    th:object="${event}" method="post">
  <div>
    <label for="eventName"
        class="block mb-2 text-sm font-medium text-gray-900">
      Event Name <span class="text-red-400">*</span>
    </label>
    <input type="text" id="eventName"
        th:field="*{eventName}" required/>
  </div>
  <div>
    <label for="eventDescription"
        class="block mb-2 text-sm font-medium text-gray-900">
      Event Description <span class="text-red-400">*</span>
    </label>
    <textarea id="eventDescription" th:field="*{eventDescription}"
        required rows="4""></textarea>
  </div>
  <div>
    <label for="eventLocation"
        class="block mb-2 text-sm font-medium text-gray-900">
      Event Location <span class="text-red-400">*</span>
    </label>
    <input type="text" id="eventLocation"
        th:field="*{eventLocation}" required"/>
  </div>
  <div class="grid md:grid-cols-2 md:gap-6">
    <div class="relative z-0 w-full group">
      <label for="eventStartDatetime"
          class="block mb-2 text-sm font-medium text-gray-900">
        Event Start Date & Time <span class="text-red-400">*</span>
      </label>
      <input type="datetime-local" id="eventStartDatetime"
          th:field="*{eventStartDatetime}" required"/>
    </div>
    <div class="relative z-0 w-full group pt-4 sm:pt-0">
      <label for="eventEndDatetime"
          class="block mb-2 text-sm font-medium text-gray-900">
        Event End Date & Time <span class="text-red-400">*</span>
      </label>
      <input type="datetime-local" id="eventEndDatetime"
          th:field="*{eventEndDatetime}" required/>
    </div>
  </div>
  <div class="grid md:grid-cols-2 md:gap-6">
    <div class="relative z-0 w-full group">
      <label for="registrationStartDatetime"
          class="block mb-2 text-sm font-medium text-gray-900">
        Registration Start Date & Time <span class="text-red-400">*</span>
      </label>
      <input type="datetime-local" id="registrationStartDatetime"
          th:field="*{registrationStartDatetime}" required/>
    </div>
    <div class="relative z-0 w-full group pt-4 sm:pt-0">
      <label for="registrationEndDatetime"
          class="block mb-2 text-sm font-medium text-gray-900">
        Registration End Date & Time <span class="text-red-400">*</span>
      </label>
      <input type="datetime-local" id="registrationEndDatetime"
          th:field="*{registrationEndDatetime}" required/>
    </div>
  </div>
  <button type="submit">
    Save
  </button>
</form>